Rear Axle Seals
Looking For Something?
Question:
“How do you replace rear axle seals?”
Answer:
Rear axle seals leaking gear lube onto the rear brake shoes and onto the wheel rim is very common on 8Ns, especially the early models before the added inner seal. The major causes of seal leakage are improper (loose) axle bearing preload and worn (loose) hubs on the axle shafts.
Installing the correct number of shims to obtain proper bearing preload when replacing seals is critical, as is having good hubs.
If your hubs were loose on the axles before, they will probably need replaced. Once the hubs get worn, they will no longer tighten against the taper splines on the axles and you’ll never stop the leaks. I have very rarely had to replace an axle shaft – severe wear from loose hubs has always been in the hub itself and the harder axle shaft was still good. You may not be so lucky.
Inspect the hubs and axle shafts closely for wear. If your hubs were tight on the axle and required some force to remove them, they are most likely ok. Replacing the seals is not too hard of a job if you’re used to working on old rusty mechanical things and have some basic tools.
Here’s a short rundown. It’s not meant to replace the I&T FO-4 shop manual for the 8N. You will need the manual on hand before you ever start replacing the seals. Refer to it as you go.
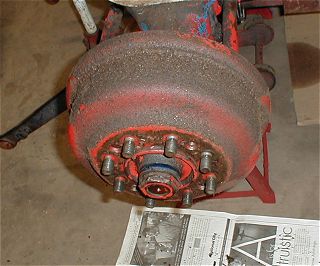
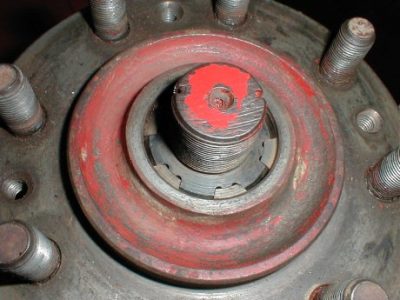
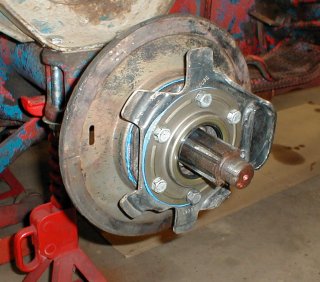
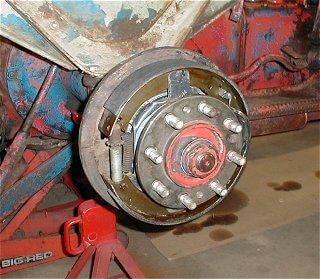
A common sight, the oil soaked rear brake drum on an 8N
If your tractor is a ’48 or’49, you have just one outer seal. If you have a ’50 – ’52 you have an outer and an inner seal. You will need the (Ford part number) A8NN4248A retainer assembly. This is actually the outer seal. The seal is pressed into the retainer.
You will need the 8N4284 gasket and the 8N4225 gasket. That’s it, unless you have the ’50 or later model in which case you will also need the 8N4233A inner seal.
First, remove the retainer wires and loosen the hub center nuts about 1 turn. Rock the rear wheel from side to side. If the hub doesn’t move on the axle, drive the tractor around for a few minutes. Do some figure 8’s. Sometimes this will loosen the hub from the axle taper and save you from having to use a large puller.
If they still don’t appear to be loose on the axle, go ahead and remove the lug nuts and rear wheel. Remove the brake drum (the 4 flat head screws holding the drum to the hub can be a bear to remove if they’re rusted in – and they usually are). Remove the brake shoes. Pull the hub off, if it’s loose. If it’s not, get a large 3 jaw puller or a special hub puller and start tightening.
Make sure to leave the hub retaining nut on the axle but have it a couple of turns away from the hub. Without the nut, the hub can pop off suddenly and do some serious damage to your knee caps.
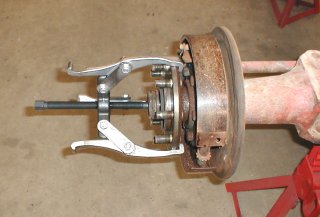
Put pressure on the puller and tap the hub. Some are really on there and I’ve even had to resort to heat from a torch to get them to pop loose. This is a good thing. If the hubs are tight they are nearly always still good.
If the hubs are loose when you start they are most likely worn out already. Once it’s off, remove the 6 bolts holding the retainer and seal assembly and pull it off. The brake shoe pivot plate will come off now.
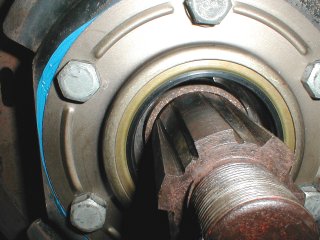
Remove the last 2 bolts from behind (tractor side) and pull the bearing retainer and backing plate and slide the axle out to get access to the inner seal (’50-’52). Remove and replace the inner seal.
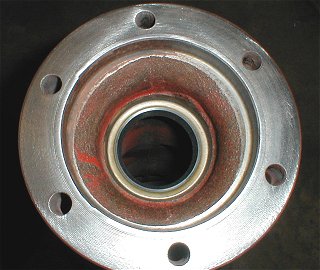
The inner seal on the ’50 – ’52 models
On early models, removing the backing plate and axle is somewhat unnecessary, but you should go this far anyway to reseal the area where grease can leak between the backing plate and axle housing flange and also make sure you have the right amount of shims to properly load the axle bearings.
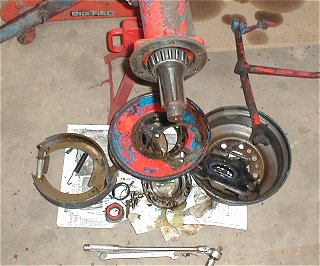
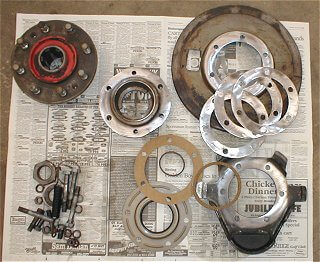
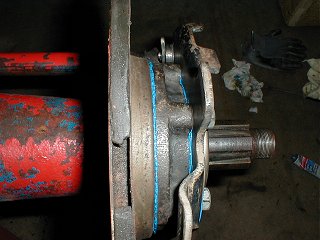
Disassembled and ready to clean
This is the time to inspect the axle bearing and cup for wear and to reset the axle bearing load. Make sure the bearing looks good, no pits in the cup or on the rollers. Make sure the backing plate, bearing retainer, and all shims and/or gaskets are clean.
I select the shims needed to load the axle bearings to zero load. Zero is hard to describe. It’s no bearing load and no end play. If you’re not sure how many shims to use, follow the procedure in the shop manual to set the load.
I think their procedure loads the bearings a little too tight, but it’s worked ok for a lot of years, so who am I to question it. Zero load is desired, but if you’re in doubt, a little too loose is better than too tight. Too tight will ruin the bearings. Too loose will let the seals leak again.
Setting the axle bearing preload with the shims is a commonly misunderstood procedure. Remember you are adjusting the total preload for both axle bearings. The axles butt together in the center of the differential and have a tapered bearing on each outside end. The total number of shims determines the preload and each shim affects both axles equally. You’re not setting each side, you’re setting the total.
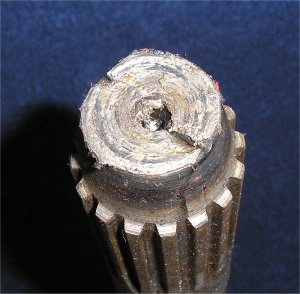
A good hub to axle fit is critical to the repair because worn hubs are the biggest cause of leaking seals. Here’s how the splines should fit between the hub and axle – flush with each other when the hub is seated tightly in place on the splines. If the axle splines protrude past the hub splines the hub is worn.
If the axle splines protrude far enough the washer will bottom out and you cannot tighten the hub onto the axle. The hub will also rub on the center of the bearing retainer. In that case, the hub is definitely shot and must be replaced.
Here’s the inside end of an axle that had too few shims installed. The bearing load was too tight and the axles butted together too tightly in the center. Besides destroying the axle bearings, the butt ends got hot enough to melt and smear the steel. Don’t load them too tight.
Be sure to pack the axle bearing with grease before you reassemble if you have the later model with inner seal. Clean all parts in a good solvent.
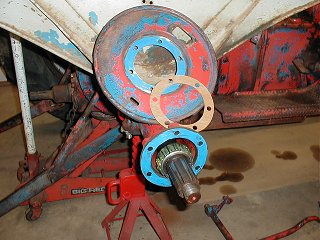
Cleaned up and ready to assemble
Reassemble with some Permatex Ultra Blue silicone RTV on all flange faces and wherever grease could leak out. The Permatex No.2 non-hardening form-a-gasket works fine, too. Use sparingly. Too much sealer just oozes out all over and is wasted as well as being ugly and possibly screwing up the bearing load you just worked so hard to set.
Use sealer on all flange faces
The 8N4284 cork gasket goes over the axle between the axle bearing and the hub. The 8N4225 cork gasket goes between the brake shoe pivot plate and the retainer/seal assembly. Use Ultra Blue there, too.
Putting it back together with the proper load
8N 4284 axle to hub cork seal installed
Sealer on every shim and face
I put a small bead of sealer around the axle shaft splines before sliding the hub back on to help keep the gear lube from leaking out the front side behind the nut. Wipe a little oil or grease on the inside lip of the new seal and around the seal diameter on the hub before the hub goes on. This keeps the seal from running dry on the hub and getting hot right away.
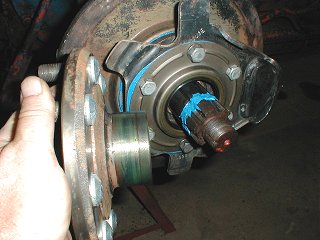
Installing the hub
Put the hub on and tighten the nut to hold it. Put the new, dry brake shoes on, install the drum, put the rear tire back on and finish by tightening the hub retaining nut REAL tight and replacing the wire clip. Adjust the brakes, and you should be leak free and stopping on a dime for the next several years. Recheck the nut occasionally to be sure it stays tight.
Finished and ready for the brake drum and wheel
Thanks to John Smith of Old Ford Tractor for allowing us to use this information.